CentOS7にLAMP環境構築を構築します。
| LAMP環境 | version |
|---|---|
| L SentOS7 | 7.2.1511 |
| A Apache | 2.4.6 |
| M MySQL | 5.7.15 |
| P PHP | 5.6.25 |
Apacheのインストール
WebサーバApacheをインストールします。
標準パッケージのApacheのバージョンは【2.4.6】なのでだいぶ古いのですが、
2.4系なのでとりあえず問題ありません。yumでインストールします。
# yum -y install httpd
インストールしたら httpd.conf を編集します。
ServerName を変更しないとApache起動時に警告が出るので下記の通り変更してください。
# gedit /etc/httpd/conf/httpd.conf
| 変更前 | 変更後 |
|---|---|
| # ServerName www.example.com | ServerName www.example.com |
Apacheの起動
# systemctl start httpd.service ←Apache起動
# systemctl enable httpd.service ←自動起動
ファイヤーウォールの設定
# firewall-cmd –permanent –add-service=http ←httpへのアクセスを許可
# firewall-cmd –reload ←リロード
動作確認
http://サーバのIPアドレス/ にアクセスしApacheのテストページが表示されればインストール完了です。
また、下記コマンドでバージョンの確認が出来ます。
# httpd -v
MySQLのインストール
MariaDBの削除
CentOS7にはデフォルトでMariaDBがインストールされています。
MariaDBがインストールされている状態では競合が発生し、
MySQLをインストールできないので、削除します。
# yum list installed | grep maria
MariaDBがインストールされていたら mariadb-libs.x86_64 等の結果が表示されます。
MariaDBがインストールされていなかった場合は以下の2行は実行不要です。
# yum remove mariadb-libs.x86_64 ←MariaDBを削除
# rm -rf /var/lib/mysql/ ←MariaDB関連のディレクトリを削除
インストール
MySQLのYumリポジトリのURLを下記の通り取得します。
http://dev.mysql.com/downloads/repo/yum/ にアクセスし、Linux 7 の Download をクリック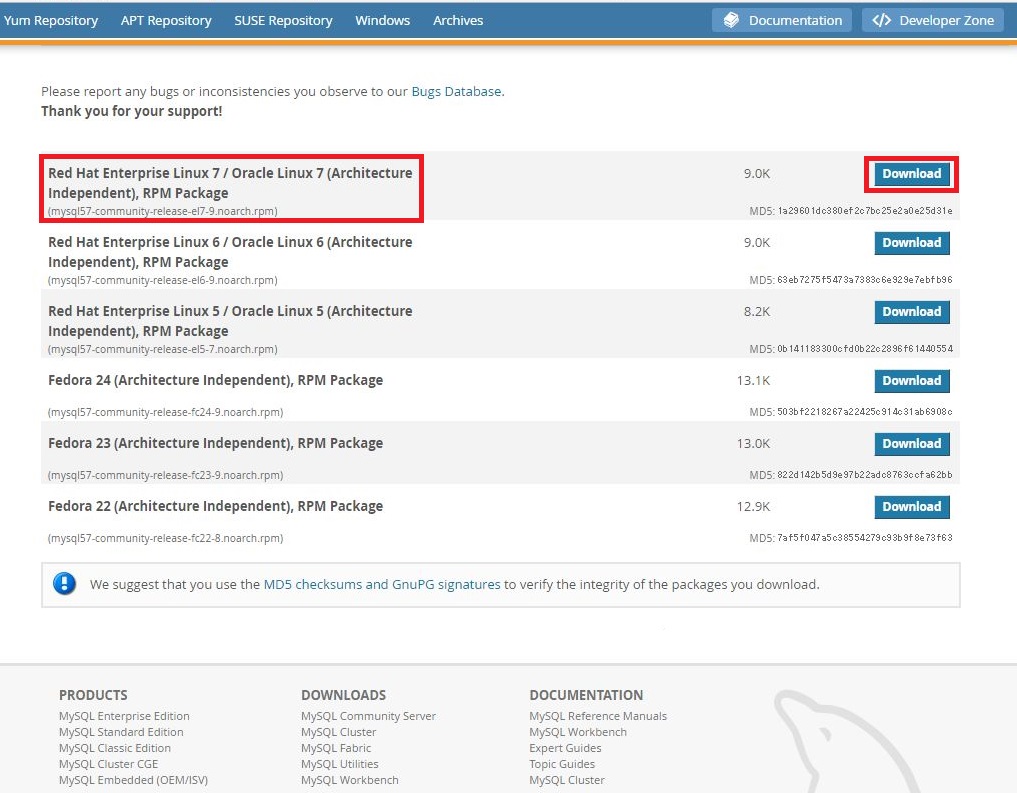
No thanks, just start my download. を右クリックし、リンクのアドレスをコピー(chromeで操作しています)
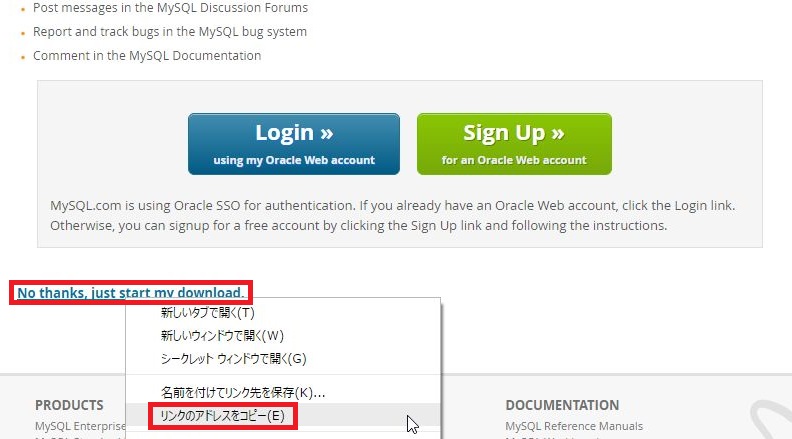
yum localinstall の後にコピーしたURLを貼りつけて実行
# yum -y localinstall http://dev.mysql.com/get/mysql57-community-release-el7-8.noarch.rpm
MySQLの最新バージョンがyumに追加されました。インストールを行います。
# yum -y install mysql-community-server
下記コマンドでバージョンの確認が出来ます。
# mysqld –version
起動と初期設定
起動設定をします。
# systemctl start mysqld.service ←MySQL起動
# systemctl enable mysqld.service ←自動起動
MySQLの初期設定を行います。
初期設定時にrootのパスワードが必要になるので確認します。
# cat /var/log/mysqld.log | grep root
A temporary password is generated for root@localhost: xxxxxxx
xxxxxxx部分がパスワードです。
対話形式で初期設定を行います
# mysql_secure_installation
以下を参考に設定してください。
| sSecuring the MySQL server deployment.
パスワードの設定 Enter password for user root: 先ほど調べたrootの初期パスワード The existing password for the user account root has expired. Please set a new password. New password: 新しいパスワード ※8文字以上の「大文字」「小文字」「数字」「記号」の4種を使用する The ‘validate_password’ plugin is installed on the server. Estimated strength of the password: 100 New password: 新しいパスワード Estimated strength of the password: 100 By default, a MySQL installation has an anonymous user, 匿名ユーザを削除 Remove anonymous users? (Press y|Y for Yes, any other key for No) : y Normally, root should only be allowed to connect from リモートでのrootログインを禁止 Disallow root login remotely? (Press y|Y for Yes, any other key for No) : y By default, MySQL comes with a database named ‘test’ that テスト用データベースは不要なので削除 Remove test database and access to it? (Press y|Y for Yes, any other key for N : y – Dropping test database… – Removing privileges on test database… Reloading the privilege tables will ensure that all changes 権限データベースをリロード Reload privilege tables now? (Press y|Y for Yes, any other key for No) : y All done! |
文字コード設定と動作確認
文字コードをUTF-8に統一します。
# gedit /etc/my.cnf
MySQLの設定ファイルを開き、最終行に2行追加
|
1 2 |
character_set_server=utf8 skip-character-set-client-handshake |
MySQLを再起動し、設定を反映させる
# systemctl restart mysqld.service
動作確認
# mysql -u root -p ←MySQLへ接続
Enter password: ←パスワード入力
Welcome to the MySQL monitor. Commands end with ; or \g.
Your MySQL connection id is 41723
Server version: 5.7.15 MySQL Community Server (GPL)
Copyright (c) 2000, 2016, Oracle and/or its affiliates. All rights reserved.
Oracle is a registered trademark of Oracle Corporation and/or its
affiliates. Other names may be trademarks of their respective
owners.
Type ‘help;’ or ‘\h’ for help. Type ‘\c’ to clear the current input statement.
mysql> show variables like ‘char%’; ←文字コードを確認するSQL分
+————————–+—————————-+
| Variable_name | Value |
+————————–+—————————-+
| character_set_client | utf8 |
| character_set_connection | utf8 |
| character_set_database | utf8 |
| character_set_filesystem | binary |
| character_set_results | utf8 |
| character_set_server | utf8 |
| character_set_system | utf8 |
| character_sets_dir | /usr/share/mysql/charsets/ |
+————————–+—————————-+
8 rows in set (0.10 sec)
mysql> exit ←MySQLを終了
Bye
PHPのインストール
CentOS7の標準パッケージでインストールできるPHPのバージョンは【5.4】です。
SSL/TLSが改良された【5.6】を使用したいので、Remiからインストールします。
インストール準備
yumのリポジトリにRemiを追加するには、EPELが追加されている必要があるので気を付けて下さい。
EPEL、Remiの追加は さくらのVPSにCentOS7をインストールしてGUI環境を構築する(1)
で紹介しているので、追加していない人は参考にしてください。
現在のPHPのバージョンを確認し、古いバージョンのPHPがインストールされていた場合は削除します。
# php -v ←インストール済みのPHPのバージョンを確認
# rpm -qa | grep php ←インストール済みPHPのパッケージを確認
上記のコマンドで古いバージョンのPHPが見つかったら下記コマンドで削除します。
# yum remove php-* ←インストール済みのPHPを削除
PHPをインストール(バージョン5.6)
remi-php56から必要なパッケージをインストールする
# yum install –enablerepo=remi,remi-php56 php php-devel php-mbstring php-pdo php-gd php-mysql php-mysqlnd
- ★php
- php-devel ・・・PHP 拡張を構築するために必要。
- ★php-mbstring ・・・マルチバイト文字列を取り扱えるようにするモジュール
- php-pdo ・・・データベース接続モジュール
- ★php-gd ・・・画像変換モジュール
- php-mysql ・・・MySQLに接続する為のモジュール
- php-mysqlnd ・・・MySQLに接続する為のモジュール
※PHPを実行環境として使うだけなら★のついている項目だけで大丈夫です。
WordPressにはphp-mysqlも必要だった気がします。
PHPの初期設定
設定ファイルを編集
# gedit /etc/php.ini
以下の表を参考に設定ファイル内を項目名で検索し書き換えてください。
【初期設定をおススメする項目】
| 設定内容 | 説明 |
|---|---|
| date.timezone = “Asia/Tokyo” | タイムゾーン |
| expose_php = Off | レスポンスヘッダにPHPの情報を載せるかどうか |
| mbsting.language = Japanese | 言語設定 |
| default_charset = “UTF-8” | 文字エンコーディングのデフォルト値 |
| mbstring.internal_encoding = UTF-8 | 内部文字エンコーディングのデフォルト値 PHP 5.6.0 で非推奨になったが、明示的に設定 default_charsetを設定した上で空欄にすることが望ましい。 |
| mbstring.http_input = UTF-8 | HTTP 入力文字エンコーディングのデフォルト値 |
| mbstring.http_output = pass | HTTP 出力文字エンコーディングのデフォルト値 |
| mbstring.encoding_translation = Off | 入力される HTTP クエリに関して、 文字エンコーディング検出および内部文字エンコーディングへの変換を行う Onの時WordPressで文字化けが発生したのでOffにした。 |
| mbstring.detect_order = auto | 文字コード検出のデフォルト値 |
| mbstring.substitute_character = none | 無効な文字を代替する文字を定義 |
次の表は今回は設定しないが、PHPを運用しながらチューニングを加える代表的な項目です。
値を何に設定するかは運用しながら決めていきます。
【運用後にチューニングする代表的な項目】
| 項目 | 説明 |
|---|---|
| memory_limit | 1プロセスが利用可能なメモリー容量の最大値 |
| post_max_size | POSTリクエストサイズの最大値 |
| upload_max_filesize | ファイルアップロードの最大値 |
| register_argc_argv | PHPが変数argvとargcを宣言するかどうかを指定 |
| max_execution_time | スクリプトがパーサにより強制終了されるまでに許容される最大の時間 |
| error_reporting | 出力する PHP エラーの種類を設定 |
| display_errors | エラーをHTML出力の一部として画面に出力するかどうか |
| log_errors | エラーメッセージを、サーバーのエラーログまたはerror_logに記録するかどうかを指定 |
| error_log | エラーが記録されるファイル名 |
より詳細な説明はPHPの本家サイトにあるのでリンクを載せておきます。
コア php.ini ディレクティブ
実行時設定 Option/info
実行時設定 エラー処理
初期設定が完了したらApacheを再起動して変更を反映させます。
# systemctl restart httpd.service
PHPの動作確認
ドキュメントルートのディレクトリにPHPの情報を表示するファイルを作成します。
# gedit /var/www/html/phptest.php
|
1 |
<?php echo phpinfo(); ?> |
phptest.phpを作成したら、ブラウザで
http://サーバのIPアドレス/phptest.php にアクセスしPHPの情報が表示されれば正常に動作しています。
動作確認後は、システム情報が外部に公開されるのは望ましくない為、
phptest.php を削除してください。
# rm -f /var/www/html/phptest.php
お疲れさまでした。LAMP環境の構築完了です。次はphpMyAdminのインストールをまとめます。
機会がありましたらまたお付き合いください。


Pingback: さくらのVPSにCentOS7をインストールしてGUI環境を構築する(3)~SSH・SELinux・ファイアウォール~ | n-portal
Pingback: phpMyAdmin | n-portal
Pingback: WordPressのインストール | n-portal